OpenGL Build Instructions
Installing prerequisite software
In order to build OpenGL applications, a number of dependencies need to be installed. Please skip down to the section relevant to where you will be working.
- Lab machines (Linux)
- Lab machines (Windows)
- Ubuntu Linux
- Max OS X
- Windows
Lab machines (Linux)
The compiler, CMake, GLM, and GLFW3 should already be installed. Skip to “Building and Running the Lab/Assignment” below.
Lab machines (Windows)
Visual Studio is installed, and solution files are provided, but you must install GLM and GLFW3 locally.
First, navigate to Document and enter the Visual Studio 2017 folder.
In this folder, create a folder called SDKs.
Next, download glm-0.9.8.5.zip at this location.
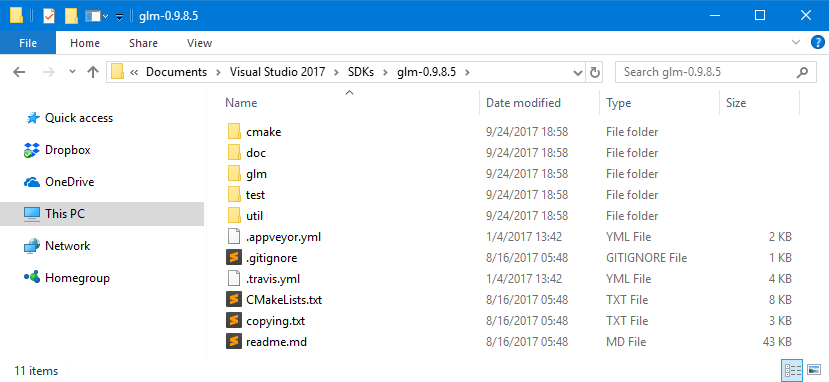
Extract the glm folder into your SDKs folder, then rename it to glm-0.9.8.5.
Finally, download glfw-3.2.1.bin.WIN64.zip at this location.
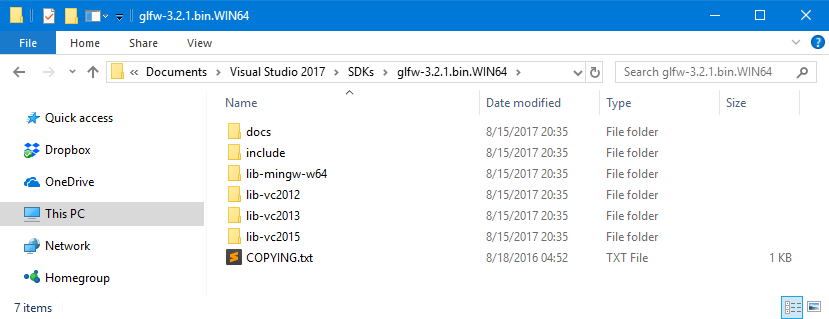
Extract the glfw-3.2.1.bin.WIN64 folder into your SDKs folder.
Skip to “Building and Running the Lab/Assignment” below.
You should see something like this if the folders are named/copied correctly:


Ubuntu Linux
You’ll need the following if you don’t have them already.
> sudo apt-get update
> sudo apt-get install g++
> sudo apt-get install cmake
> sudo apt-get install freeglut3-dev
> sudo apt-get install libxrandr-dev
> sudo apt-get install libxinerama-dev
> sudo apt-get install libxcursor-dev
> sudo apt-get install libglfw3-dev
> sudo apt-get install libglfw3-dev
Mac OS X
You can use homebrew/macports or install these manually.
- Xcode developer tools. You’ll need to log in with your Apple ID.
- CMake (http://cmake.org/download/)
- GLM
- GLFW3
Make sure the commands g++ and cmake work from the command prompt.
Windows
First, download Visual Studio Community 2017. Make sure to install the C++ development tools.
At this point, you can choose to follow the “Lab machines (Windows)” instructions above.
Or, if you would rather do CMake (or if you have a different version of Visual Studio and don’t want to change), follow these steps:
Download these:
- CMake (http://cmake.org/download/). Make sure to add CMake to the system path when asked to do so.
- vcpkg
Make sure the command cmake works from the command prompt.
Now use vcpkg to install glm:x64-windows and glfw3:x64-windows.
Building and Running the Lab/Assignment
All platforms (except Lab windows)
We’ll perform an “out-of- source” build, which means that the binary files will not be in the same directory as the source files. In the folder that contains CMakeLists.txt, run the following.
> mkdir build
> cd build
Then run one of the following from the build folder, depending on your choice of platform and IDE.
OSX & Linux Makefile
> cmake ..
This will generate a Makefile that you can use to compile your code. To compile the code, run the generated Makefile.
> make -j4
The -j argument speeds up the compilation by multithreading the compiler.
This will generate an executable, which you can run by typing
> ./Lab3 ../resources
to run e.g. the Lab 3 base code.
To build in release mode, use ccmake .. and change CMAKE_BUILD_TYPE to
Release. Press ‘c’ to configure then ‘g’ to generate. Now make -j4 will
build in release mode.
To change the compiler, read this page. The best way is to use environment variables before calling cmake. For example, to use the Intel C++ compiler:
> which icpc # copy the path
> CXX=/path/to/icpc cmake ..
OSX Xcode
> cmake -G Xcode ..
This will generate e.g. Lab3.xcodeproj project that you can open with Xcode.
- To run, change the target to
Lab03by going to Product -> Scheme -> Lab03. Then click on the play button or press Command+R to run the application. - Edit the scheme to add command-line arguments (
../../resources) or to run in release mode.
Windows Visual Studio 2017
The provided .sln should work out of the box, provided you installed the two dependencies.
- To build and run the project, right-click on e.g.
Lab3in the project explorer and then click on “Set as Startup Project.” Then press F7 (Build Solution) and then F5 (Start Debugging). - To add a commandline argument, right-click on e.g.
Lab3in the project explorer and then click on “Properties” and then click on “Debugging.”
Windows Visual Studio 2015
Or on your own machine, if you would prefer to use CMake.
Use vcpkg to install glfw3 and glm.
> cmake ..
By default on Windows, CMake will generate a Visual Studio solution file,
Lab00.sln, which you can open by double-clicking. If you get a version
mismatch, you may have to specify your visual studio version, for example:
> cmake -G "Visual Studio 14 2015" ..
Other versions of Visual Studio are listed on the CMake page (http://cmake.org/cmake/help/latest/manual/cmake-generators.7.html).
- To build and run the project, right-click on e.g.
Lab3in the project explorer and then click on “Set as Startup Project.” Then press F7 (Build Solution) and then F5 (Start Debugging). - To add a commandline argument, right-click on e.g.
Lab3in the project explorer and then click on “Properties” and then click on “Debugging.”