Lecture 6: Lighting
Illumination
How does light really work?
For our simulation (ray tracer) we need to take into account all the light inter-reflections. In other words, for a single point we need to account for all the incoming light from all directions, from light sources and “bounced light”, and then compute how that incoming light is reflected differently in every direction based on the surface’s BRDF (bi-directional radiance distribution function).
This can be computed for a particular point, in a particular viewing direction.
If we integrate all the incoming light (over a half sphere, for example) multiplied by the surface reflection and (incident angle) i.e. the reflectance, we can compute how much light leaves a given point.
The rendering equation is a geometric approximation of this:
Or
The total light of wavelength directed along at time from is the emitted light () plus the BRDF (proportion of light reflected for this surface) multiplied by the incoming light multiplied by the attenuation of light due to angle.
Various algorithms try to compute the more global properties of light, notable radiosity, but one can also compute more global attributes of light using rays.
Consider if we traced a finite set of rays coming from the light source and computed how they “bounced” around and lit up a scene, accumulating their “color” from each reflection.
Of course, tracing from the light is very inefficient because many rays will not be “seen”, thus we only trace the “visible” rays, those that can be seen by the virtual camera.
Shading
At this point we are computing camera rays and finding intersecting objects. Now we need to accurately light the models that our rays are intersecting.
Recall the Phong lighting model:
Where , , and specify the material colors for ambient, diffuse, and specular respectively. Similarly, specifies the light color. Note that we omit an ambient light color since ambient light is supposed to represent global illumination that is not tied to a particular light. specifies the shininess of the material. And, , , , and specify the normal, light, view, and reflection vectors (respectively).
Note how these vectors are defined in this image:

Note in particular how the view vector points towards the viewer from the surface. When computing this value in your ray tracer, you will need to negate the direction of your ray.
The image also includes the half-vector
In the Blinn-Phong shading model (as opposed to the Phong shading model), we replace with , where the half-vector is computed by:
(i.e., the normalized sum of the view and light vectors).
Note that while this is considered an approximation, it has been found that the Blinn-Phong model more accurately reproduces lighting for many types of real-world materials.
Also note that this is not an approximation when the vectors are co-planar (as in this image) - in that case, it is equivalent. It is an approximation when the vectors are not co-planar, which is common in 3D scenes but not possible in a 2D figure as above :)
Multiple Lights
To support multiple lights, we loop over each light and sum up the diffuse and specular contributions (but do not duplicate ambient light):
Shadows
To support shadows we need to be able to detect when an occluder exists between the surface fragment that we are shading and each light source.
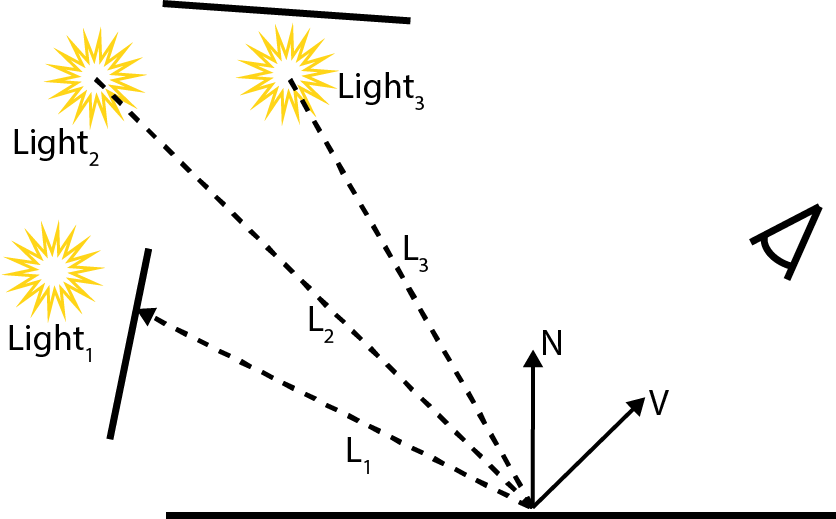
Consider the following image, in which a planar surface is illuminated by three light sources:

Note that Light 1 is blocked by an occluder, while Light 2 and Light 3 are “visible” from the surface point we are shading. Luckily in our ray tracers we already have mechanisms for checking if a given ray intersects any objects in the scene.
Given some incident ray which intersects geometry in the scene.
Given an intersection, we have known and can compute:
This point allows us to compute the Light vector for some light with position :
We can then produce a new ray to test against our scene. Note that we use instead of to represent the “time” parameter:
This ray starts at the intersection point we are shading, and travels in the direction of the light.
There is one problem with this setup, however. Unless we explicitly exclude the current object from our ray search, we will most like find an intersection at . We want to prevent these self-intersections from happening. The most robust way to do so is by applying a small epsilon offset to the ray origin. Note that in practice, failure to apply an offset to ray origins will not result in all pixels in the scene being in shadow. Instead, numeric imprecision will cause about half of your pixels to be shadowed, producing a weird noisy pattern that is commonly referred to as shadow acne.
Where is a small constant. The best value for this constant depends on scene parameters, but for the scenes will we encounter in this class I have found the following to be a reasonable value:
There’s one last problem: note that in the image above, Light 3 is not occluded by the planar geometry above it. However, our L3 ray will intersect this geometry. We need to check the distance of closest intersection against the light distance to determine whether the light is occluded.
Pseudocode
function raycolor(vec3 p0, vec3 d)

    if (ray_hits_something_in_scene(p0, d, out float t)) then

        pt := p0 + d * t // solve for point

        color := obj.color * obj.amb // no matter what, always add the ambient color


        for all lights:

            in_shadow := false
            l := light_vector()

            if (you_hit_anything_on_way_to_light_with_ray(pt, l, out float s)) then

                if (s < length(light_position - pt))

                    in_shadow := true

            if (not in_shadow) then

                color += compute_diffuse()
                color += compute_specular()

    else

        color = background_color